

Wednesday, 17 April 2013
Saturday, 6 April 2013

Monday, 11 March 2013


Monday, 11 February 2013
Wedding made of Lego coming together
Just some progress pictures for you today:


Should have more in depth updates coming up soon!


Should have more in depth updates coming up soon!
Thursday, 13 December 2012
Indecision of Vases
First of all. Apologies for the lack of updates recently. I had a wedding planning break to take part in NaNoWriMo and then it was my birthday and now its getting close to Christmas so I haven't been up to much wedding planning wise in the past couple of months.
I did however decide that the tall white vases we had were just no good and I wanted smaller ones.
So the centre pieces went from looking like this:
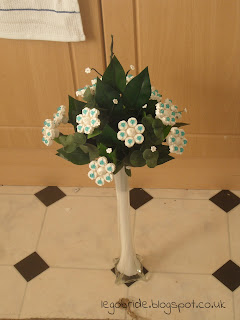

The display isn't sitting right in the vase in this picture and the quality is terrible but it gives you an idea.
The overall look is some much better in these smaller vases. I'm so much happier with it.
I will start posting more soon, I'll take some better pictures of the new vase and post some better pictures of the new display design soon too. Bare with me!
I did however decide that the tall white vases we had were just no good and I wanted smaller ones.
So the centre pieces went from looking like this:

To looking like this:

The display isn't sitting right in the vase in this picture and the quality is terrible but it gives you an idea.
The overall look is some much better in these smaller vases. I'm so much happier with it.
I will start posting more soon, I'll take some better pictures of the new vase and post some better pictures of the new display design soon too. Bare with me!
Saturday, 6 October 2012
Letters Made of Lego

This was the mock up I made on the Lego digital designer software.
And here I have the real thing:


I was concerned before we got them they would be quite small but I'm actually really happy with the height, they're 9cm/3.5 inches tall. Which is big enough to look great on the register table or the top table. The M's kept coming apart really easily when I picked them up but it was nothing a dab of super glue couldn't fix.
Wednesday, 3 October 2012
Bridesmaid Bouquet Made of Lego
Following the same instructions posted Here- Bouquet Made of Lego I finished my Bridesmaids bouquet. We had our bulk order of Lego show up recently so I was finally able to put it together. I have a lot of posts to do and all sorts of other things to show you so stay tuned for those!


I'm really happy with this, it's so cute.
Here's the underside and the handle.

I found this looping does a good job at hiding all the stems and makes it much tidier. Ideally I'd liked to have used a satin ribbon to give it a softer feel and look, rather than this water proof oasis stuff. But I've got so much of it it seemed silly to not use it.
I decided to do the same to the brides bouquet and also shorten the handle as it was a bit too lengthy for my liking.
 Much better.
Here's them both together with a couple of buttons holes
.

I've had such a blast making these that I'm seriously considering making them for anyone who is interested, be it for weddings or any other occasions. I'll probably think about it more seriously after my own wedding but if anyone is interested now, get in contact! I'll be happy to discuss options and prices.


I'm really happy with this, it's so cute.
Here's the underside and the handle.

I found this looping does a good job at hiding all the stems and makes it much tidier. Ideally I'd liked to have used a satin ribbon to give it a softer feel and look, rather than this water proof oasis stuff. But I've got so much of it it seemed silly to not use it.
I decided to do the same to the brides bouquet and also shorten the handle as it was a bit too lengthy for my liking.

Here's them both together with a couple of buttons holes
.

I've had such a blast making these that I'm seriously considering making them for anyone who is interested, be it for weddings or any other occasions. I'll probably think about it more seriously after my own wedding but if anyone is interested now, get in contact! I'll be happy to discuss options and prices.
Wednesday, 5 September 2012
A Short Haired Bride With a Long Veil
This is current me,

Now, let me assure you I did try to grow my hair out for the wedding, the front reached down to my jaw and the back was coming down over my shoulders.
But as you may have gathered, I couldn't stand it and cut it all off again. It's only been within the last year or so I've dare to cut my hair this short, but turns out I just prefer it this way. It feels more me!
So what's a short haired bride to do?
Well that's the elastic band method, tying a few tiny ponytails with elastic bands helps give a veil comb a good grip. Pretty useful for short hair brides who do have a bit of length. But unlikely to be of much use to me, my hair is fine along with being short so the comb would probably be visible through the rest of my hair.
So my solution?
Hair extension clips!


Much more discreet, holds well, doesn't slip and looks great!
That's not the best picture cause my hair is a mess, but you get the idea! Can't always be looking my best when I'm trying out these crazy ideas!
Saturday, 1 September 2012
Invites Featuring Lego
But, we have so much other stuff we need to make, adding in invites was just giving us more work. So we searched around for something reasonably priced that would take the hassle away from us. I don't think either of us cared enough about invites to put effort into making them amazing from scratch, so we took the easier option and went for something simple that would give a respectable impression to our guests, but also have a touch of Legoy goodness.

We went with this design from http://www.invitationhouse.co.uk
Can't fault their service, they were very helpful and were quick to send us out two extra after our initial order. The invites came with everything we asked for printed on, including guest names, with free envelopes and with velcro stick on things to keep them closed.

Here's ours with our Lego flower addition. It's so cute, I bet most people won't even recognise it as a Lego flower. So while it is a clue to our theme I bet a lot of people will still be none the wiser.

Here's a look inside, this particular one we got for ourselves to keep.We kept the wording simple, not formal not too informal and just from us. We didn't add any inserts or even RSVP cards, we've left it up to the guests to let us know they're coming in anyway they wish and all the extra info can be found on our wedding website. Much less fussy.

The pictures not very good I'm afraid but here's the production line of plain invites to Lego invites. I'd been looking forward to doing it for ages but it was actually really tedious ha! Still I'm pleased they're done, look great and are ready to be sent out!
Sunday, 26 August 2012
Buttonholes Made of Lego

Here are 2 out of 11 button holes I need to make, We're doing them for immediate family mostly. Groom, Best man, Usher, Usher/driver, Brides brother 1, Brides brother 2, Grooms sister 1, Grooms sister 2, Father of Groom, Mother of Groom and Mother of Bride.
One Lego flower stem with one leaf was trimmed down to button hole appropriate size. You can find out how I put these together here if you haven't already seen!


The next step was to wrap the mini Lego flower stem in florist tape, I used a blob of hot glue on the flower and poked the wire through the hole. Once wrapped both flowers needed bending forward so they would face out when worn.


Then all that was left was to put the mini Lego flower in position, I liked it against the leaf, then wrapped the wire around the main flower stem. Then finally wrapping them together with florist tape to finish it off.


And there we have it, Lego flower buttonhole.

Grooms buttonhole as in the first picture at the top will have two mini Lego flowers, the rest of the men will have one as pictured above. And I think for the women I'll add a little blue ribbon to the stem just to girly it up a bit more.
Subscribe to:
Posts (Atom)