Following the same instructions posted Here- Bouquet Made of Lego I finished my Bridesmaids bouquet. We had our bulk order of Lego show up recently so I was finally able to put it together. I have a lot of posts to do and all sorts of other things to show you so stay tuned for those!
I'm really happy with this, it's so cute.
Here's the underside and the handle.
I found this looping does a good job at hiding all the stems and makes it much tidier. Ideally I'd liked to have used a satin ribbon to give it a softer feel and look, rather than this water proof oasis stuff. But I've got so much of it it seemed silly to not use it.
I decided to do the same to the brides bouquet and also shorten the handle as it was a bit too lengthy for my liking.
Much better.
Here's them both together with a couple of buttons holes
.
I've had such a blast making these that I'm seriously considering making them for anyone who is interested, be it for weddings or any other occasions. I'll probably think about it more seriously after my own wedding but if anyone is interested now, get in contact! I'll be happy to discuss options and prices.
Showing posts with label Lego. Show all posts
Wednesday, 3 October 2012
Saturday, 1 September 2012
Invites Featuring Lego
But, we have so much other stuff we need to make, adding in invites was just giving us more work. So we searched around for something reasonably priced that would take the hassle away from us. I don't think either of us cared enough about invites to put effort into making them amazing from scratch, so we took the easier option and went for something simple that would give a respectable impression to our guests, but also have a touch of Legoy goodness.
We went with this design from http://www.invitationhouse.co.uk
Can't fault their service, they were very helpful and were quick to send us out two extra after our initial order. The invites came with everything we asked for printed on, including guest names, with free envelopes and with velcro stick on things to keep them closed.
Here's ours with our Lego flower addition. It's so cute, I bet most people won't even recognise it as a Lego flower. So while it is a clue to our theme I bet a lot of people will still be none the wiser.
Here's a look inside, this particular one we got for ourselves to keep.We kept the wording simple, not formal not too informal and just from us. We didn't add any inserts or even RSVP cards, we've left it up to the guests to let us know they're coming in anyway they wish and all the extra info can be found on our wedding website. Much less fussy.
The pictures not very good I'm afraid but here's the production line of plain invites to Lego invites. I'd been looking forward to doing it for ages but it was actually really tedious ha! Still I'm pleased they're done, look great and are ready to be sent out!
Sunday, 26 August 2012
Buttonholes Made of Lego
Here are 2 out of 11 button holes I need to make, We're doing them for immediate family mostly. Groom, Best man, Usher, Usher/driver, Brides brother 1, Brides brother 2, Grooms sister 1, Grooms sister 2, Father of Groom, Mother of Groom and Mother of Bride.
One Lego flower stem with one leaf was trimmed down to button hole appropriate size. You can find out how I put these together here if you haven't already seen!
The next step was to wrap the mini Lego flower stem in florist tape, I used a blob of hot glue on the flower and poked the wire through the hole. Once wrapped both flowers needed bending forward so they would face out when worn.
Then all that was left was to put the mini Lego flower in position, I liked it against the leaf, then wrapped the wire around the main flower stem. Then finally wrapping them together with florist tape to finish it off.
And there we have it, Lego flower buttonhole.
Grooms buttonhole as in the first picture at the top will have two mini Lego flowers, the rest of the men will have one as pictured above. And I think for the women I'll add a little blue ribbon to the stem just to girly it up a bit more.
Sunday, 19 August 2012
Bouquet Made of Lego
Oh yes.
Here it is.
In as step by step as I could manage.
It's actually quite difficult to remember to take pictures of each step when you're really focused on just putting the darn thing together!
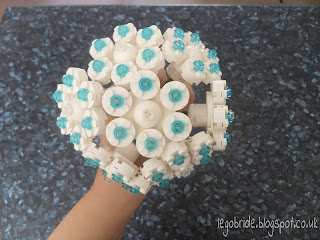
So here's the start of 7 of the flowers bided together. This is actually as big as I plan to make my Bridesmaids bouquet only it'll have leaves round the outside like this one will eventually have.
They're a little difficult to hand tie. They don't align easily and they don't really overlap. So there's not a whole lot I can do about the gaps.
Here's a picture of the underside. I used cello tape to start with because I didn't want to use up all my fast depleting florist tape.
They do make a good spherical shape despite the gaps.
I tried starting off with two flowers crossed over but it was much easier to get a good shape with one in the middle and the others around the outside.
Here it is with the final row.
All the flowers making up the final row had leaves on the stems. Just like the ones in the centre piece post.
In fact, they are the the ones from the centre piece post, which means I'll need to get some more to redo the centre pieces. I was too impatient to start the bouquet to wait to buy more Lego!
I was happy with it as it was there but there were two things bothering me about it.
One: it didn't have anything special about it compared to the centre pieces really. And-
Two: those darn gaps!
So I put some mini flowers on some wire and added them to the gaps.
It hasn't really solved the gap problem but it has added a "baby's breath" like affect which I like.
I've resigned to the fact that there's nothing I can do about the gaps and in a way, it's good the gaps are there because you can pick out the individual flowers rather than it looking like a mass ball of Lego.
Here it is with the handle!
I was planning to use a tube of kitchen foil or cling film or the kitchen roll tube. But what I actually ended up doing was using the wall lining paper we had got to practice our table "runners." I just rolled it up to a thickness that was sturdy and wrapped the ribbon around, securing with pins.
Then tied the bow round the top just for extra added cuteness.
Overall, I'm pretty happy with it.
It's not what I originally planned with the blue flowers. But I just couldn't get the blue flowers to work, they were too big and bulky. So they'll be used in the centre pieces now I think.
Part of me is tempted to take it apart again and try and redo it. But I probably won't because I cannot improve the gap situation and the mini flowers look just fine scattered like they are. I'd probably be tempted to make them a bit more uniform but I don't think that'll be the way to go.
I guess I'll see how I feel about it in the next few months.
Up coming posts:
-Button holes
-Lego veil update
-Centre piece update
Keep an eye out for those!
Here it is.
In as step by step as I could manage.
It's actually quite difficult to remember to take pictures of each step when you're really focused on just putting the darn thing together!
So here's the start of 7 of the flowers bided together. This is actually as big as I plan to make my Bridesmaids bouquet only it'll have leaves round the outside like this one will eventually have.They're a little difficult to hand tie. They don't align easily and they don't really overlap. So there's not a whole lot I can do about the gaps.
Here's a picture of the underside. I used cello tape to start with because I didn't want to use up all my fast depleting florist tape.
They do make a good spherical shape despite the gaps.
I tried starting off with two flowers crossed over but it was much easier to get a good shape with one in the middle and the others around the outside.
Here it is with the final row.
All the flowers making up the final row had leaves on the stems. Just like the ones in the centre piece post.
In fact, they are the the ones from the centre piece post, which means I'll need to get some more to redo the centre pieces. I was too impatient to start the bouquet to wait to buy more Lego!
I was happy with it as it was there but there were two things bothering me about it.
One: it didn't have anything special about it compared to the centre pieces really. And-
Two: those darn gaps!
So I put some mini flowers on some wire and added them to the gaps.
It hasn't really solved the gap problem but it has added a "baby's breath" like affect which I like.
I've resigned to the fact that there's nothing I can do about the gaps and in a way, it's good the gaps are there because you can pick out the individual flowers rather than it looking like a mass ball of Lego.
Here it is with the handle!
I was planning to use a tube of kitchen foil or cling film or the kitchen roll tube. But what I actually ended up doing was using the wall lining paper we had got to practice our table "runners." I just rolled it up to a thickness that was sturdy and wrapped the ribbon around, securing with pins.
Then tied the bow round the top just for extra added cuteness.
Overall, I'm pretty happy with it.
It's not what I originally planned with the blue flowers. But I just couldn't get the blue flowers to work, they were too big and bulky. So they'll be used in the centre pieces now I think.
Part of me is tempted to take it apart again and try and redo it. But I probably won't because I cannot improve the gap situation and the mini flowers look just fine scattered like they are. I'd probably be tempted to make them a bit more uniform but I don't think that'll be the way to go.
I guess I'll see how I feel about it in the next few months.
Up coming posts:
-Button holes
-Lego veil update
-Centre piece update
Keep an eye out for those!
Wednesday, 15 August 2012
Favours Made of Lego
I wanted to talk a little about our favour choices.
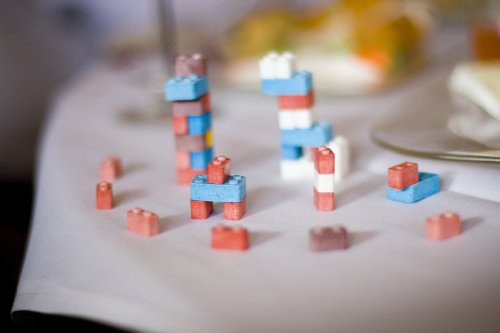
We've had a few people to suggest to us that we use these for our favours:
And yeah, I get it. They're cool you can stack them like real Lego and probably have a blast playing around with them, like so:
BUT
The thing is...
They just don't taste nice.
They taste like chalk. No one is going to eat them- they'll just get played with and end up being thrown away in the end. Plus, they don't fit in with our colour scheme and I don't fancy buying loads and picking out just the white/blue ones.
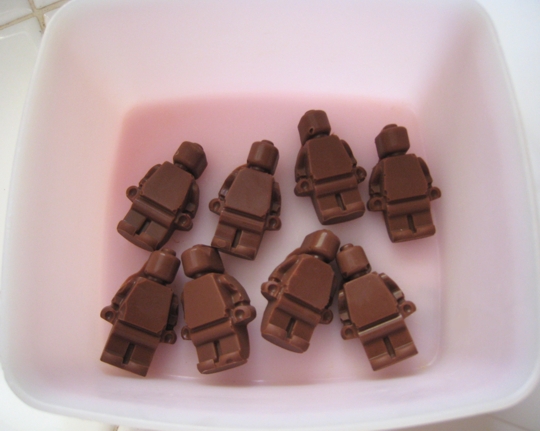
Now, these!
These are cute AND tasty. They're likely to get eaten and still be enjoyed, they're easier to fit into our theme and overall a little more suitable for adults and children alike!
But if we could manage stackable chocolate bricks... that would blow my and everyone else's minds!
Hmm
*Ponders the possibilities*
We've had a few people to suggest to us that we use these for our favours:
And yeah, I get it. They're cool you can stack them like real Lego and probably have a blast playing around with them, like so:
| Credit: reenigne.org |
BUT
The thing is...
They just don't taste nice.
They taste like chalk. No one is going to eat them- they'll just get played with and end up being thrown away in the end. Plus, they don't fit in with our colour scheme and I don't fancy buying loads and picking out just the white/blue ones.
Now, these!
| Credit: justJENN recipes |
These are cute AND tasty. They're likely to get eaten and still be enjoyed, they're easier to fit into our theme and overall a little more suitable for adults and children alike!
But if we could manage stackable chocolate bricks... that would blow my and everyone else's minds!
Hmm
*Ponders the possibilities*
Sunday, 1 July 2012
Veil Made of Lego
I had a lot of mind changing when it came to veils. I had already decided to put Lego flower embellishments on my dress, but when I decided I wanted a cathedral length veil -since I didn't want my dress to have a train- I thought my Lego flowers would be better suited to the veil.
Being the type of person who refuses to pay four figures for a wedding dress, I wasn't about to pay three, or even two figures for a veil. So I hit up ebay in search of a cheap veil and happened across this:
For the grand total for £5.25.
What I didn't realise was those were actually pearl bead detailing and not crystals. But no matter, they were glued on horribly with a glue gun in big globs anyway. To be expected for what I only paid a fiver for I suppose.
I spent the rest of the day melting the glued on pearls with an iron. It took ages and the glue left some marks in places, so I really don't recommend doing that, if I hadn't had different detailing to cover it up it probably would have been ruined.
So the lesson is, cheap veils from china are a bargain, IF they don't have beads/crystals on. Lesson learned for me, but luckily I'm still able to make good use of it!
These are my Lego flowers complete with gems ready to go on the veil.
Turns out, I had to use a glue gun to put them on the veil with. I tried fabric glue and super glue, but it just wasn't sticking. Even when dry they just peeled right off. Hot glue from the glue gun worked a charm though. I just made sure to put very small amounts on and then pressed a tiny bit of white organza on the back so the glue had something to bond to on both sides.
And there it is!
You probably noticed from the first picture the veil doesn't have a comb. I need to get one for it. I've already trimmed and gathered it ready for a comb. I plan to wear it under bun style and not over the face. So the top came off and cut to a length to fit my not quite 5'3 height. I just need to find a wire comb for it now.
Pretty pleased with it overall!
Being the type of person who refuses to pay four figures for a wedding dress, I wasn't about to pay three, or even two figures for a veil. So I hit up ebay in search of a cheap veil and happened across this:
For the grand total for £5.25.
What I didn't realise was those were actually pearl bead detailing and not crystals. But no matter, they were glued on horribly with a glue gun in big globs anyway. To be expected for what I only paid a fiver for I suppose.
I spent the rest of the day melting the glued on pearls with an iron. It took ages and the glue left some marks in places, so I really don't recommend doing that, if I hadn't had different detailing to cover it up it probably would have been ruined.
So the lesson is, cheap veils from china are a bargain, IF they don't have beads/crystals on. Lesson learned for me, but luckily I'm still able to make good use of it!
These are my Lego flowers complete with gems ready to go on the veil.
Turns out, I had to use a glue gun to put them on the veil with. I tried fabric glue and super glue, but it just wasn't sticking. Even when dry they just peeled right off. Hot glue from the glue gun worked a charm though. I just made sure to put very small amounts on and then pressed a tiny bit of white organza on the back so the glue had something to bond to on both sides.
And there it is!
You probably noticed from the first picture the veil doesn't have a comb. I need to get one for it. I've already trimmed and gathered it ready for a comb. I plan to wear it under bun style and not over the face. So the top came off and cut to a length to fit my not quite 5'3 height. I just need to find a wire comb for it now.
Pretty pleased with it overall!
Friday, 15 June 2012
Centre Pieces Made of Lego
Well here it is, more or less. It's needs some fiddling but this is the basic final idea for our table centres!
They originally had no leaves, these were a recent addition, but it really sets them off and to be completely honest, saves us a fortune in Lego.
If you're wondering how these were put together, keep reading cause I have some pictures to show you the rough stages.
First of all, the tools!
1. The thickest longest florist wire I could find.
2. Short eye screws
3. Florist tape.
The idea was to screw in the eye screw into the Lego so we have something easy to attach the florists wire to and thus making the stem.
This was really quite easy, you can do it with your fingers if you're tough enough, but a weakling like me used a pair of pliers for better grip.
Either way, they screw easy and hold perfectly stable.

Getting the wire through the eye screw and having it stable was a little more complicated.
A few different attempts at twisting it around and we eventually managed to get it so it didn't wobble at all.
The only thing left after that was the wrap the stems in florist tape.
Once the florist tape was all wound on the stem was ready to attach to the Lego flower.
All done!

So we made up and bunch and got hold of some artificial leaves to attach to them.
This was also simple to do. I just wound them to the stem with florist tape. Some times some of the leaves wouldn't go where I wanted them to, so I just cut them off the stems and attached them individually.
I'm toying with the idea of adding more leaves lower on the stems but I'm not convinced they need it.
So there we have it. That's how our Lego flower centre pieces came together! One down, five to go!
Monday, 26 March 2012
Lego Take on a Wishing Tree
On review of our budget we realised we need to tackle the subject of the guest book. We originally didn't have anything Lego like for this and it wasn't until we were googling around for a plain old guest book that we came across tags for wishing trees.
I wasn't keen on wishing tree's when I first saw them so I hadn't even considered it as a possibility.
However!
My husband to be came up with a great idea on how we can use Lego to make our own unique 'wishing tree.'
Not so much a tree but a big flat base that can sit on an easel.
On the base plate he designed an image to go on this. Very cleverly he made up a mosaic of our venue!
How amazing is that?!
The tags with be on a string that is also tied to a brick like this.
Thus our guests will be able to write on their tags and stick the Lego to the board!
After the wedding we'll be able to frame the board and keep it as a memento of the day!
So there you have it. Lego take on a wishing tree, with the benefits of a both a normal guest book and a signing frame!
This is one of our Lego projects I'm really excited about!
I wasn't keen on wishing tree's when I first saw them so I hadn't even considered it as a possibility.
However!
My husband to be came up with a great idea on how we can use Lego to make our own unique 'wishing tree.'
Not so much a tree but a big flat base that can sit on an easel.
On the base plate he designed an image to go on this. Very cleverly he made up a mosaic of our venue!
![]() | |
| The Wishing Board Design |
![]() |
| Our Venue |
How amazing is that?!
The tags with be on a string that is also tied to a brick like this.
Thus our guests will be able to write on their tags and stick the Lego to the board!
After the wedding we'll be able to frame the board and keep it as a memento of the day!
So there you have it. Lego take on a wishing tree, with the benefits of a both a normal guest book and a signing frame!
This is one of our Lego projects I'm really excited about!
Wednesday, 14 March 2012
The Mock Up & The Real Thing
And here are the pictures of the real thing.
If you compare the mock up of the bigger blue ones to the actual picture, you'll see the ring in the middle is black and not white. This is cause Lego decided they would discontinue the white ones, which was a major inconvenience!
They did say they would send me some white ones they had left for free but I haven't heard from them yet.
So plan B involves some white spray paint. Which seems to be working okay. Luckily only a small part of the black piece shows through so the paint shouldn't be too obvious.
It might need another coat or two.
Overall quite pleased with them though.
The blue ones are actually quite large. I'll post a picture soon so you can tell just how big it is. I'd estimated I would need nine of them. Turns out five is probably enough.
Ordered a few extra bits for making up the actual bouquets today as well. Pretty soon should have a good idea on how they're going to look and how to put them together. Then I just have to make about five more!
Here's the white spray painted parabolic ring, next to the original black one. Can hardly tell right? Really pleased with it.
Subscribe to:
Posts (Atom)